To get the electronic injection system, the first thing you need is a computer, or in the case a miniaturized computer.I choose the arduino for simplicity of code (remember I'm MECHANICAL engineer, not a programmer especialist, despite having work experience with it), USB interface for easy connection, and a reasonable number of inputs and outputs. , how to connect the most different things to precise injection . Another reason to choose the Arduino is the large developer community on the internet that, like me in this post share their projects and thereby help solve the problem of others.
Then you need to define what will be necessary for the operation of the injection. Let's stick to the basic:
-Control the fuel, using the injector (or several)
-Control the ignition coil (or several) (the first version of the kart injection was so simple that wore the original CDI )
-Read Engine load (MAF, MAP or TPS)
-read The engine speed and know your PMS (hall sensor, distributor, tone wheel, whatever)
This makes it possible to start the engine.
Now it's time to put it all together.
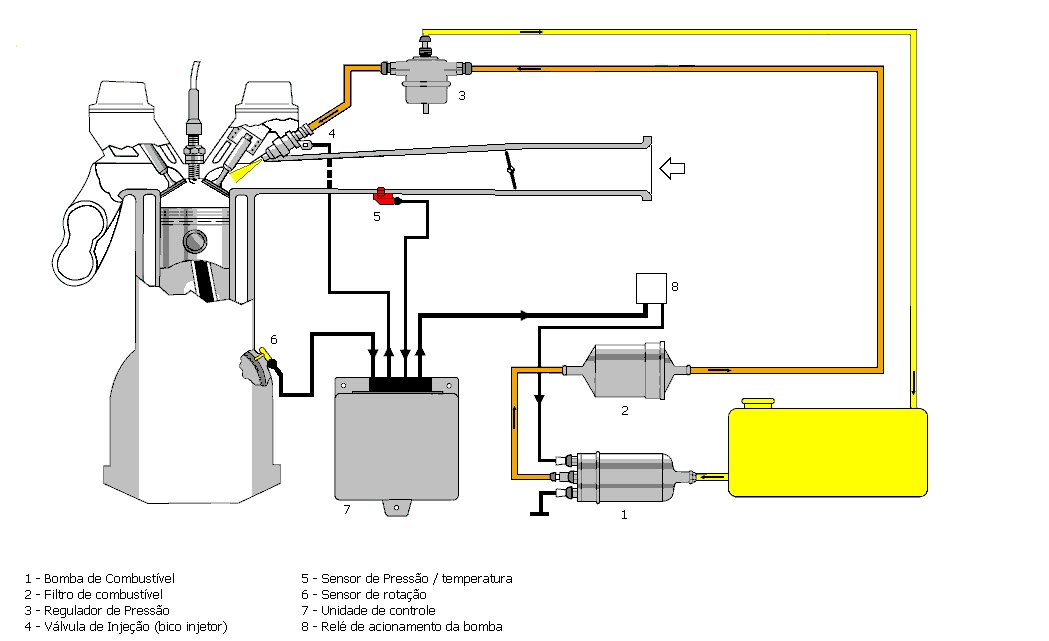
Here I will give the example of my kart, everything was used and how it was used. First you need to make a way to the fuel reach the engine, so, you need a fuel pump, a fuel pressure regulator, and a fuel injector, and of couse, all the hoses that connects these parts.
To interface the sensors and actuators with the processor, it is necessary a circuit board that lessens noise, attenuates or amplifies the signals, in other words, let the signals ready to be read by the processor, and allow the actuator to work properly.
So first you have to know the "language" spoken by each piece.
-To Read the motor load, used a MAP sensor, Bosch, code 0261230030. It tells the absolute pressure with a value of 0-5v linearly from 0 to 115KPa (simplified, look for the correct calibration curve).
-for The rotation in the case of CG engine I use in the kart, I simply used the original rotation sensor that comes with the engine of the original bike. It is an inductive type sensor, and sends a voltage pulse (+ - 30v) every time a tooth (in case one coupled to the crankshaft)passes by it. When he is in positive voltage maximum, this means that the crankshaft is at 15º before TDC (top dead center) (it came like that, no particular reason).
-Fuel injector: I used a high impedance Bosch, code: 0280155821. This nozzle has a flow rate of 200cm3 / min (can not remember now).
-Bobina: I used a coil of Fiat Uno (one of two outputs) connecting one of the spark plug wires directly on the motor housing, and the other in the spark plug itself (I will not explain why it now, just believe me ... it works).
To install the injection engine, had also to develop an intake manifold that allows the pressure sensor to be installed in the intake duct for him to read the motor load, it should also contain a throttle plate, and hold and drive nozzle to make a good mix air-fuel.

Here is a compilation of the circuits the board uses:


Next time: the code.
send me the code themselves
ResponderExcluirhello, please send me code, thank you
Excluirjverban@hotmail.com
aonde esta codigo
ResponderExcluirI am doing the same project.i need your help.can you give your contact email id?
ResponderExcluirsrranjithr7@gmail.com
thanks!
Este comentário foi removido pelo autor.
ResponderExcluirOlá!
ResponderExcluirEstou envolvido com um projeto com meus estudantes, vc poderia me enviar o código, por gentileza?
prof. Hamilton P. da Silva - utfpr medianeira - pr
Boa noite! me envie o código, estou iniciando um projeto similar! podemos unir forcas! abraco
ResponderExcluirhudson.alesse@gmail.com
Hola hermano, me interesó mucho tu trabajo, te importaría compartirmelo?
ResponderExcluirmalibrans@live.com
Gracias Bro 👍
manda o projeto com o codigo pra mim irmão. to querendo injetar minha caravan. mais quero fazer minha propria injeção. baldinmarcelo@gmail.com
ResponderExcluir